Hi everybody,
quite often I face the following "problem": Wipe does good job on removing gradients and finding a good enough first color balance. But most often a slight red color cast remains (maybe due to the full spectrum mod of my DSLR?). In order to get rid of this, I enter the color module. The default color module algorithm starts to calculate and do its thing. Unfortunately, the resulting color balance is often farther off from a good balance than the initial balance which resulted from Wipe and with which I entered the color module (at least in my opinion). Thus, I have to do far more adjustments than neccessary. I would rather like to tweak the colors from the initial balance. But I see no option to get back there. Clicking the reset button does not give the result with which I entered the module. And there is no option like "no algorithm" which blocks the calculation process.
Did I miss something in the color module?
Thanks in advance!
BTW: StarTools is an amazing piece of software and I really appreaciate the recent updates.
Best regards
Stefan
Color balancing

Re: Color balancing
Hi Stefan,
Wipe does not color balance - it only subtracts an image-wide bias.
The Color module's default color balance tends to be a useful starting point for visual spectrum data but only if no color aberrations exist in your image. E.g. if your lens or scope suffers from chromatic aberration, then the balance will be off.
If your camera has been modified, then it is fundamentally impossible to achieve a visual spectrum-only color balance (simply because the spectrum is extended). It's not the end of the world, but it is important to know, so that you don't end up going in circles trying to find the "perfect" balance.
If you can post some before/after images, that might be useful to better understand what you're after. Sharing the dataset would also really help to relate to what you're seeing.
Thank you!
Ivo Jager
StarTools creator and astronomy enthusiast
StarTools creator and astronomy enthusiast
Re: Color balancing
Hi Ivo,
What I see before Wipe --> beforewipe.JPG. After Wipe it's pretty red --> afterwipe.jpg. But it doesn't look to bad after AutoDev. I then enter the Color module with an image that has I slight red cast to it in my eyes --> beforecolor.JPG (see next post). I'd like to reduce that by using the 'reduce red color bias' slider. But before I can start the default algorithm results in a balance which is pretty off in my opinion --> aftercolor.JPG. Probably I can tweak it from the image resulting from the algorithm (aftercolor.JPG). But I'd rather like to tweak it from before the algorithm (beforecolor.JPG).
You can of course have a look at my dataset, if you wish:
https://www.dropbox.com/s/qa1ps5xpkxgbx ... a.FTS?dl=0
Take into account that the l-eNhance filter was used. Thus, there is no "right" color balance.
Here you can see what I am after:
https://www.astrobin.com/6haq98/?nc=user
The overall red cast in the upper right quarter is missing, for example. This balance was achieved solely in Photoshop by adjusting the levels of the different channels separately and setting a grey point. This image is missing the advanced stretching, deconvolution etc. from StarTools but I like the color balance. The stars have a neutral white appearance which is kind of characteristic for the l-eNhance.
Best regards
Stefan
Thanks for pointing that out. So I rather meant the intial color balance of AutoDev/FilmDev after removing gradients by Wipe. AutoDev and FIlmDev do color balancing, right? At least in the Dev module one can chose between calibration on stars and the dark anomaly filter.Wipe does not color balance - it only subtracts an image-wide bias.
What I see before Wipe --> beforewipe.JPG. After Wipe it's pretty red --> afterwipe.jpg. But it doesn't look to bad after AutoDev. I then enter the Color module with an image that has I slight red cast to it in my eyes --> beforecolor.JPG (see next post). I'd like to reduce that by using the 'reduce red color bias' slider. But before I can start the default algorithm results in a balance which is pretty off in my opinion --> aftercolor.JPG. Probably I can tweak it from the image resulting from the algorithm (aftercolor.JPG). But I'd rather like to tweak it from before the algorithm (beforecolor.JPG).
You can of course have a look at my dataset, if you wish:
https://www.dropbox.com/s/qa1ps5xpkxgbx ... a.FTS?dl=0
Take into account that the l-eNhance filter was used. Thus, there is no "right" color balance.
Here you can see what I am after:
https://www.astrobin.com/6haq98/?nc=user
The overall red cast in the upper right quarter is missing, for example. This balance was achieved solely in Photoshop by adjusting the levels of the different channels separately and setting a grey point. This image is missing the advanced stretching, deconvolution etc. from StarTools but I like the color balance. The stars have a neutral white appearance which is kind of characteristic for the l-eNhance.
Best regards
Stefan
- Attachments
-
-
- afterwipe.JPG (343.87 KiB) Viewed 4047 times
-
-
-
- beforewipe.JPG (300.79 KiB) Viewed 4047 times
-
Re: Color balancing
Next images
- Attachments
-
-
- aftercolor.JPG (98.1 KiB) Viewed 4047 times
-
-
-
- beforecolor.JPG (102.92 KiB) Viewed 4047 times
-
Re: Color balancing
Did you try sampling the stars for colour ? Mask > stars >do >shrink > grow twice >keep back to colour module press sample >mask >clear >invert > keep back to colour module , screen blinks three times all image colour balanced ,check rgb for green and adjust green channel to suit .
Regards Dave
Regards Dave
Re: Color balancing
That might be a good workaround and first approximation. I will try next time! Thanks! 
Best regards
Stefan
Best regards
Stefan
Re: Color balancing
Hi Stefan,
Thank you for uploading that datataset.
Are you sure you are using the recommended settings for DSS? The dataset seems color balanced already, while the expected background bias is missing. Noise also seems extremely correlated - it appears you are not dithering at all?
It is also quite rare for the target to be visible in the linear data unless you were close to over-exposing the core, or unless the dataset has been stretched by something.
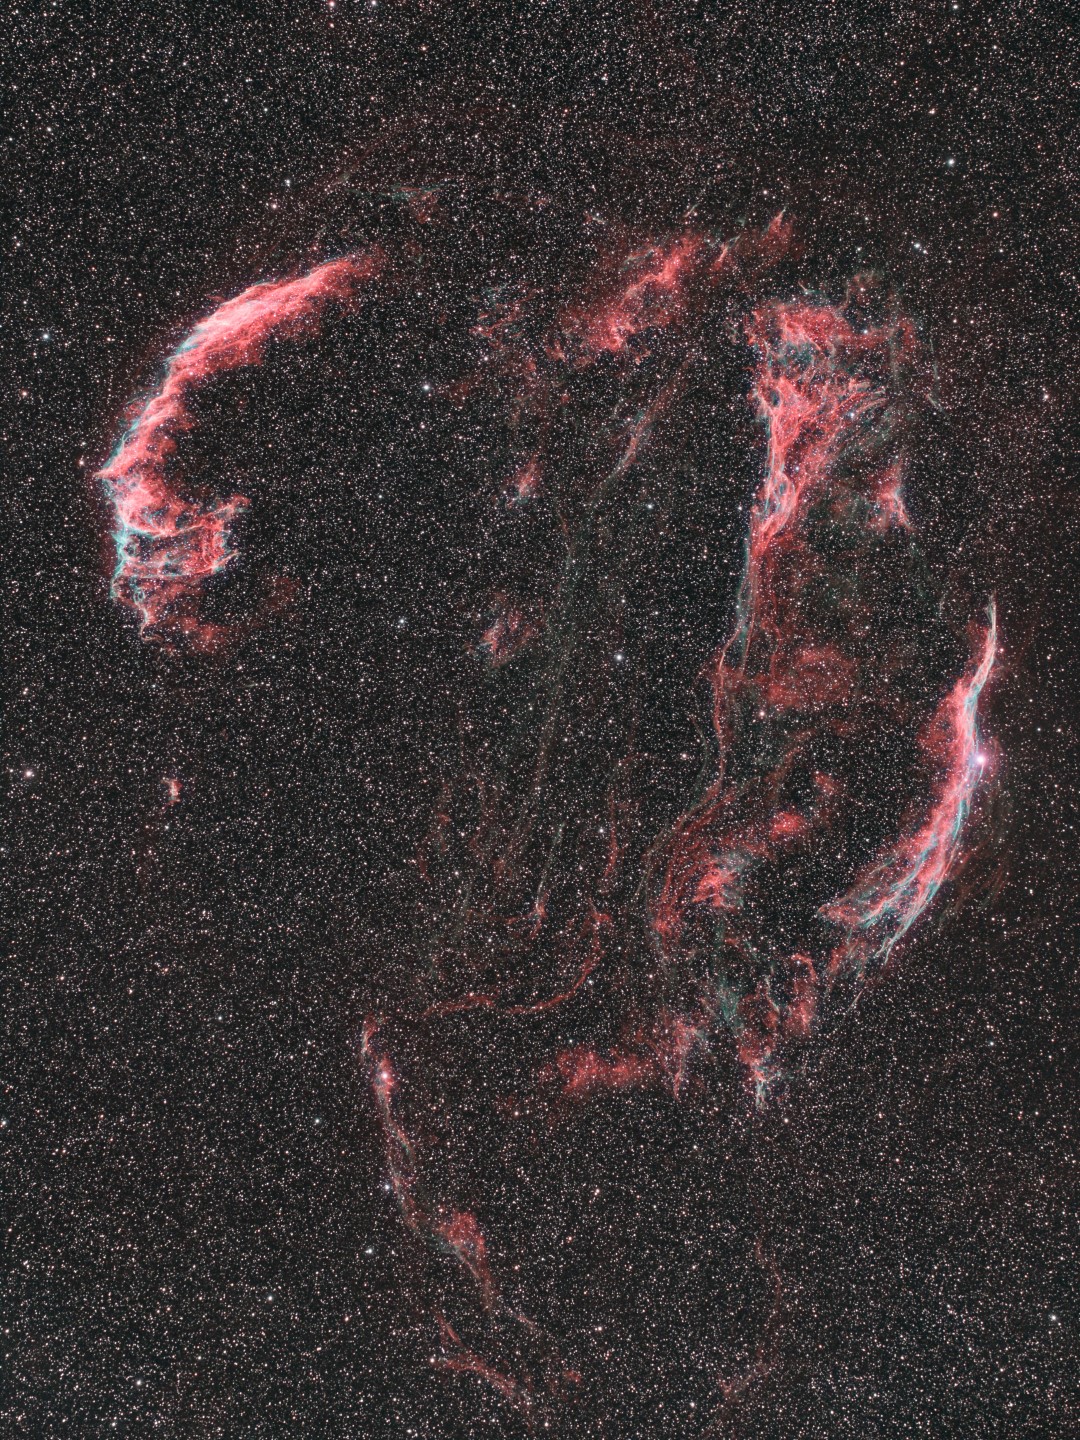
This is the expected, text-book rendering of this target when acquired through a duo/tri/quad band filter.
Stars shot through a duo/tri/quadband are absolutely not white and this is absolutely not (fortunately not!) a characteristic of theses filters; they have two distinct passthrough regions in their spectral response not one (like a pure Ha filter). On the contrary, stars when using these filters, mostly appear blue, as stars tend to radiate little in the Ha band, therefore making blue/green dominant. Where did you read/hear that stars are supposed to be white? That is simply not the case...
Finally, please be careful when running noise reduction routines that are meant for terrestrial purposes - they almost always introduce detail that does not exist (they do so in response to noise), and make assumptions about scenes (e.g. geometrical shapes and line continuities) that do not apply in outer space. Sadly, quite a bit of made-up detail is visible in the AstroBin image, such as the "fur" below;
Great if you make pictures of your dog or cat, but better left alone if you're doing astrophotography... 
Lots to address here, though most of it should hopefully be an easy (and free!) fix!
Thank you for uploading that datataset.
Are you sure you are using the recommended settings for DSS? The dataset seems color balanced already, while the expected background bias is missing. Noise also seems extremely correlated - it appears you are not dithering at all?
It is also quite rare for the target to be visible in the linear data unless you were close to over-exposing the core, or unless the dataset has been stretched by something.
This is what StarTools comes up with using the default settings (after Wipe), however with increased saturation in the the shadows (see Dark Saturation);What I see before Wipe --> beforewipe.JPG. After Wipe it's pretty red --> afterwipe.jpg. But it doesn't look to bad after AutoDev. I then enter the Color module with an image that has I slight red cast to it in my eyes --> beforecolor.JPG (see next post). I'd like to reduce that by using the 'reduce red color bias' slider. But before I can start the default algorithm results in a balance which is pretty off in my opinion --> aftercolor.JPG. Probably I can tweak it from the image resulting from the algorithm (aftercolor.JPG). But I'd rather like to tweak it from before the algorithm (beforecolor.JPG).
-
- StarTools_232.jpg (475.95 KiB) Viewed 3998 times
What you are after (and what the AstroBin image depicts) is not "correct" in terms of what you recorded. The AstroBin image is not color balanced at all and seems to have unceremoniously thrown away most chrominance signal from the O-III/Hb bands.Here you can see what I am after:
https://www.astrobin.com/6haq98/?nc=user
The overall red cast in the upper right quarter is missing, for example. This balance was achieved solely in Photoshop by adjusting the levels of the different channels separately and setting a grey point. This image is missing the advanced stretching, deconvolution etc. from StarTools but I like the color balance. The stars have a neutral white appearance which is kind of characteristic for the l-eNhance.
Stars shot through a duo/tri/quadband are absolutely not white and this is absolutely not (fortunately not!) a characteristic of theses filters; they have two distinct passthrough regions in their spectral response not one (like a pure Ha filter). On the contrary, stars when using these filters, mostly appear blue, as stars tend to radiate little in the Ha band, therefore making blue/green dominant. Where did you read/hear that stars are supposed to be white? That is simply not the case...
Finally, please be careful when running noise reduction routines that are meant for terrestrial purposes - they almost always introduce detail that does not exist (they do so in response to noise), and make assumptions about scenes (e.g. geometrical shapes and line continuities) that do not apply in outer space. Sadly, quite a bit of made-up detail is visible in the AstroBin image, such as the "fur" below;
-
- Selection_235.png (67.63 KiB) Viewed 3998 times
Lots to address here, though most of it should hopefully be an easy (and free!) fix!
Ivo Jager
StarTools creator and astronomy enthusiast
StarTools creator and astronomy enthusiast
Re: Color balancing
Hi Ivo,
thanks for having a look at the dataset!
https://astrobackyard.com/optolong-l-enhance-filter/
https://visibledark.ca/wp-content/uploa ... -Large.jpg
https://www.astrobin.com/j4i80z/?nc=user
https://www.astrobin.com/d7ukri/?nc=user
https://astrofarsography.com/wp-content ... -Video.jpg
https://astrofarsography.com/wp-content ... Nebula.jpg
Stars look white to me. I assume all of them were processed in a wrong way?
Here is a shot of the Helix nebula of my own with the l-eNhance wich has been processed in StarTools (https://www.astrobin.com/l6xhdt/?nc=user). Stars appear neutral, whereas the OIII signal in the center of the nebula is still prominent. Seems okay to me

Apart from scrutinizing the dataset and coming back to my initial question: there's no way to adjust an image in the color module without running the algorithm beforehand, right? So one could tweak the colors of the image with which one enters the module?
Best regards
Stefan
thanks for having a look at the dataset!
Not sure about every single setting in DSS, but I'm pretty sure there was no color balancing. The stack has definitely not been stretched afterwards in any software. And there was definitely no gradient removal. It came right out of DSS. But I will check on the next opportunity. Maybe it wasn't the most recent version of DSS...?Are you sure you are using the recommended settings for DSS? The dataset seems color balanced already, while the expected background bias is missing.
Indeed I do; if I remember correctly dithering was 10 pixels on the guide camera which corresponds to 30 pixels on the imaging camera. Not enough?Noise also seems extremely correlated - it appears you are not dithering at all?
The info came from a video. Can't find it right now. But have a look at a bunch of images which were shot with such filters from different persons (stacked and processed with varying softwares):Stars shot through a duo/tri/quadband are absolutely not white and this is absolutely not (fortunately not!) a characteristic of theses filters; they have two distinct passthrough regions in their spectral response not one (like a pure Ha filter). On the contrary, stars when using these filters, mostly appear blue, as stars tend to radiate little in the Ha band, therefore making blue/green dominant. Where did you read/hear that stars are supposed to be white? That is simply not the case...
https://astrobackyard.com/optolong-l-enhance-filter/
https://visibledark.ca/wp-content/uploa ... -Large.jpg
https://www.astrobin.com/j4i80z/?nc=user
https://www.astrobin.com/d7ukri/?nc=user
https://astrofarsography.com/wp-content ... -Video.jpg
https://astrofarsography.com/wp-content ... Nebula.jpg
Stars look white to me. I assume all of them were processed in a wrong way?
Here is a shot of the Helix nebula of my own with the l-eNhance wich has been processed in StarTools (https://www.astrobin.com/l6xhdt/?nc=user). Stars appear neutral, whereas the OIII signal in the center of the nebula is still prominent. Seems okay to me
That's why I'd prefer to render the dataset in StarTools. But color still appears (!) off to meFinally, please be careful when running noise reduction routines that are meant for terrestrial purposes
Apart from scrutinizing the dataset and coming back to my initial question: there's no way to adjust an image in the color module without running the algorithm beforehand, right? So one could tweak the colors of the image with which one enters the module?
Best regards
Stefan
Re: Color balancing
I forgot another example of l-eNhance with white stars and still prominent OIII signal. It's from this forum:
download/file.php?id=1812
Presumably processed in StarTools
Regards
Stefan
download/file.php?id=1812
Presumably processed in StarTools
Regards
Stefan
Re: Color balancing
Just in case you haven't seen this, have a look here for all the recommended settings (have a look at the screenshots as well to make sure everything is there in your version).Not sure about every single setting in DSS, but I'm pretty sure there was no color balancing. The stack has definitely not been stretched afterwards in any software. And there was definitely no gradient removal. It came right out of DSS. But I will check on the next opportunity. Maybe it wasn't the most recent version of DSS...?
Hmmmm.... That's really strange.Indeed I do; if I remember correctly dithering was 10 pixels on the guide camera which corresponds to 30 pixels on the imaging camera. Not enough?
I can clearly see blotches and co-located warm/cold pixels;
-
- Selection_008.png (99.04 KiB) Viewed 3969 times
It seems some of the creators of these examples indeed don't even try to balance Ha and O-III/Hb, which is a real shame. Though there are some examples where highlights are just de-saturated due to stretching chrominance data along with the luminance (StarTools gives you the choice not to do this).The info came from a video. Can't find it right now. But have a look at a bunch of images which were shot with such filters from different persons (stacked and processed with varying softwares):
https://astrobackyard.com/optolong-l-enhance-filter/
https://visibledark.ca/wp-content/uploa ... -Large.jpg
https://www.astrobin.com/j4i80z/?nc=user
https://www.astrobin.com/d7ukri/?nc=user
https://astrofarsography.com/wp-content ... -Video.jpg
https://astrofarsography.com/wp-content ... Nebula.jpg
Stars look white to me. I assume all of them were processed in a wrong way?
That said, when you get into narrowband territory there are no set rules really when it comes to color. However rarely is detail thrown away like that (the opposite is the case; co-located bands like Ha and SII are remapped evenly across the spectrum to exaggerate color for the purpose of visualizing different emissions rather than hiding them!). The Veil nebula is indeed one example where people all of a sudden "wake up" to the power of the duo/tri/quadband filters.
You don't, of course, have to use Color Constancy mode (which tends to accentuate star colors and makes those stars extra blue). To emulate the way other software desaturates highlights, you can use the Legacy mode/preset. You can also use the Bi-color preset, which was created specifically for duo/tri/quadband data like this. Use the Matrix option to cycle through other bi-color options.
Even if you do not plan to use Color Constancy mode, it is generally recommended to start off with the Color Constancy mode for diagnostics purposes (so you can 100% see and check all areas of color before desaturating them).
To start off with something close to the unbalanced version, just set all Bias Reduce/Increase sliders to 1.0, and Bright/Dark saturation to Full.
Finally, you can also intentionally destroy the high frequency color information in the stars if you want to make them appear neutral. Do your color calibration first in the Color module, ignore he coloring of the stars for now. Then launch the Layer module. Mask, Auto, Stars, Do, Keep.
Now, set Layer Mode to "Color of foreground", now set Filter Kernel Radius to something large (>30 px). You Can throttle the effect by using the Blend Amount.
What all this does, is blur the color information across the image, but only uses that blurred color information for the stars (e.g. where the mask is set). The blurred image will be very "neutral" (as each pixels becomes a blend of all the colors in its vicinity).
Very nice indeed!Here is a shot of the Helix nebula of my own with the l-eNhance wich has been processed in StarTools (https://www.astrobin.com/l6xhdt/?nc=user). Stars appear neutral, whereas the OIII signal in the center of the nebula is still prominent. Seems okay to me
Hopefully the above will help (e.g. set sliders to 1.0, set saturation to full for bright/dark saturation). Tweaking the colors "as you see them" (e.g, with which you enter the module) is from a signal processing point of view "illegal"; color balancing needs to be performed on linear data (modifying coloring of stretched data aside from perhaps saturation doesn't make sense from a signal/photographic point of view). The Tracking engine applies your color balancing to the linear data and then forward propagates + recomposites the result so it is all mathematically (and photographically) correct.Apart from scrutinizing the dataset and coming back to my initial question: there's no way to adjust an image in the color module without running the algorithm beforehand, right? So one could tweak the colors of the image with which one enters the module?
Hope this helps!
Ivo Jager
StarTools creator and astronomy enthusiast
StarTools creator and astronomy enthusiast